Sunday 17 October 2010

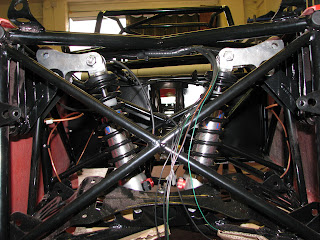
Steering Rack and Front Suspension

Today I finished fitting the Steering rack.
Apart from having to file the brackets out a little, to fit the rack, it went in very easily. The bolts were a little long, so they were cut down (a bit more weight out!!).


Before fitting the front wishbones, the powder coating in the bolt holes needed to be cleaned out.  I also measured and cut the bolts down in advance.
The lower wishbones were fitted first, loosly fitting the bolts, so I could assemble the upright and upper wishbone.
The uprights are steel lightweight specials, which are actually lighter than the alloy ones available, I did have to tap out the powdercoating, but again, no other problems with fitting them.
The washers were fitted, but only to hold the bones in a rough position, as I want to get proper spacers made to replace them.
With the balljoints fitted, the front suspension is assembled, although it needs to be setup.


Saturday 9 October 2010

Day 6

Last day of my holiday today, so will be my last report for a week.

Today I started bolting on the rear suspension, I've only loosely assembled the wishbones, as I need to work out the spacer dimensions and alignment. that will have to wait for next week now :-(


To assemble the front wishbones, the body needs to be cut out, which is a job that most people dread, but you can't see both sides at the same time, so if they don't match, it's not the end of the world.


With the holes cut, last job was to trial fit the steering rack, the brackets are a bit tight, so they
need to be eased out with a file to fit snugly.


So I've done around 42 hours work on it this week, and I've got around 10 days (1 day per weekend) till the end of the year (not including Xmas holiday) to finish against my target.  

It's going to be a challenge !!

Keep watching.


Friday 8 October 2010

Day 4&5

I missed posting yesterday, as I went out for a beer and curry (didn't help the weight loss for next year!!)

Yesterday started with painting the bulkhead panels, although I only had a paint on primer, so there's a few to many brush marks in the final finish than I would have liked. Should have gone with powder coating, but I couldn't wait !!

The rear loom was fitted although I had to wait for the panels to be dry before I could fit the front section. The MNR loom is very easy to fit and lines up fine.


Final job of the day was to run all the front brake lines and rivet them in place.

Today with the panels dry, I sealed and riveted all the panels.


With the panels fitted I could finish running the front loom.


With all the main lines in place, its time to start with the bolt on bits.
I started with the front Rocker and Shock assys.
The rockers are made from billet aluminium (very nice),and run with needle and Thrust bearings. All the bolts were cut down to reduce weight, (couple more curries I can have).


The final job of the day was to fit the body tub. Had  some help from George with this, but goes on very easy, and is finished well.


It's starting to look like a car now. Hopefully I'll have all the rear suspension on tomorrow.

Wednesday 6 October 2010

Day 3

Today was a good day, but also frustrating. I did a trial assembly of the diff, and found I couldn't get the diff in with where the lines were run, so I had to drill out the rear clips and re-position the fuel lines.

Once I got the diff in, I started laying out the rear brake lines, changing my mind a couple of times.
I've found most of my time is spent thinking about the best way to lay things out, for ease of access and safety.

I managed to get all the rear brake lines and rear loom clipped in, then started to finish drilling the bulkhead panels.

A handy tip when drilling the panels, get yourself some temporary rivets, they come with a tool to insert and remove them (thanks to George for lending them to me). You drill the first hole, then insert the first t-rivet, this holds the panel for the next one. Once you have 2 in you can drill all the other holes without worrying about holding the panel.
Temporary rivet with tool.


Rivets in place.

With the front panels finished I started to fit the loom through to the bulkhead.

Final job of the day was to have a tidy up (the wife popped in after work and commented on the mess!!), so I got the vacuum out (wonders will never cease!!)

Tuesday 5 October 2010

Day 2

Better day today, started with finishing the bulkhead panels, then popped into ETB to order my Digidash Pro+. Spent more money!! ( but only what I budgeted, if the wife's reading :-)

This afternoon was spent bending fuel and brake lines, making sure they are all clear of any sharp edges and not rubbing on anything, I hate this job.


My last job ofthe day was to start laying the loom out, I hope to get this fixed in tomorrow.


I couldn't resist having a sit in it, my excuse was to see how long the steering column needs to be (come on we've all done it).


Monday 4 October 2010

Day 1

Started slow today, I had to go to dentist this morning, then sort out my son's scooter insurance, so I didn't really get going till midday.

Took the engine out first. I'd put it in the chassis for transport, but was in the way for running the fuel and brake lines.
I decided to split the pedal box bulkhead panel, to make it easy to access the pedal box if necessary, and got all the holes drilled to mount the box and panel.


I wasn't happy with the pedal box pivots, so made up some spacers, and machined out the pivot bushes so they would run on the spacers. This all meant I could bolt up the pivots tight without clamping the pedals.

My final job of the day was to make the tank straps and mount the fuel tank.


I forgot to take the camera to the workshop today, so will get some pics tomorrow.

Sunday 3 October 2010

Welcome

Welcome to my Blog.

Unfortunately I missed the opportunity to write a blog of my first build, but here's the highlights.

2005, After looking at all the other kit manufacturers, I bought an MNR RT+ kit with an R1. I was sold after being taken out by Marc at Brands.
I did originally want a duratec powered car, but after experiencing a bike powered car, I was sold on it.

2006 Car was SVA'd

2006-2010 lots of shows and trackdays.

2010, I decided I wanted more than just trackdays, so decided to sell the car, and build a new car to go racing in the 750mc RGB series.

This is the last picture of my old car at it's new home :-(


So with a bundle of notes in my pocket, I started looking at what kit I should build for racing.

I could have gone with a tried and tested Fury based car, but with the experience I'd had with MNR and my belief that their chassis/setup works well, I decided to stick with them.

After discussing with Chris and Marc, we agreed a package and did a deal :-)

The only change I made, after my initial decision, was on the engine. I originally wanted an 08 R1, but following many failures in the field (thanks to Andy Bates for bringing it to my attention), I decided to go with the 08 CBR1000.

So final package:

MNR RT+ Chassis with full cage
08 CBR1000
Willwood Brakes
13" ProRace 1.2 wheels
DigiDash 2 Pro+
Plus all the rest of the bits to make it work....

So on the 27th September I took my trailer up to Harrogate to pick up my new project from MNR.

Chassis safe and sound in new home.

 I've now got a week off work to get as much done as possible, as I've got a deadline of Christmas to get it finished. This should give me a few months to get the car set up and ready for the start of the season.

So watch this space, I'll try to keep it updated at every step.

Cheers, Steve.