Friday 24 December 2010

Good progress this week

I got back from Valencia late on Friday afternoon after a 2.5 hour delay!!
I'd hoped to start building on Saturday, but my back was playing up again, so I had the weekend off, and was in a foul mood, by Sunday night, thinking I was going to loose another weeks building.

I'd booked this week off so was happy that my back felt better on Monday morning, and armed with sandwiches biscuits and tea,I made my way to the workshop.

I made good progress this week, especially with the extra help from Gavin.

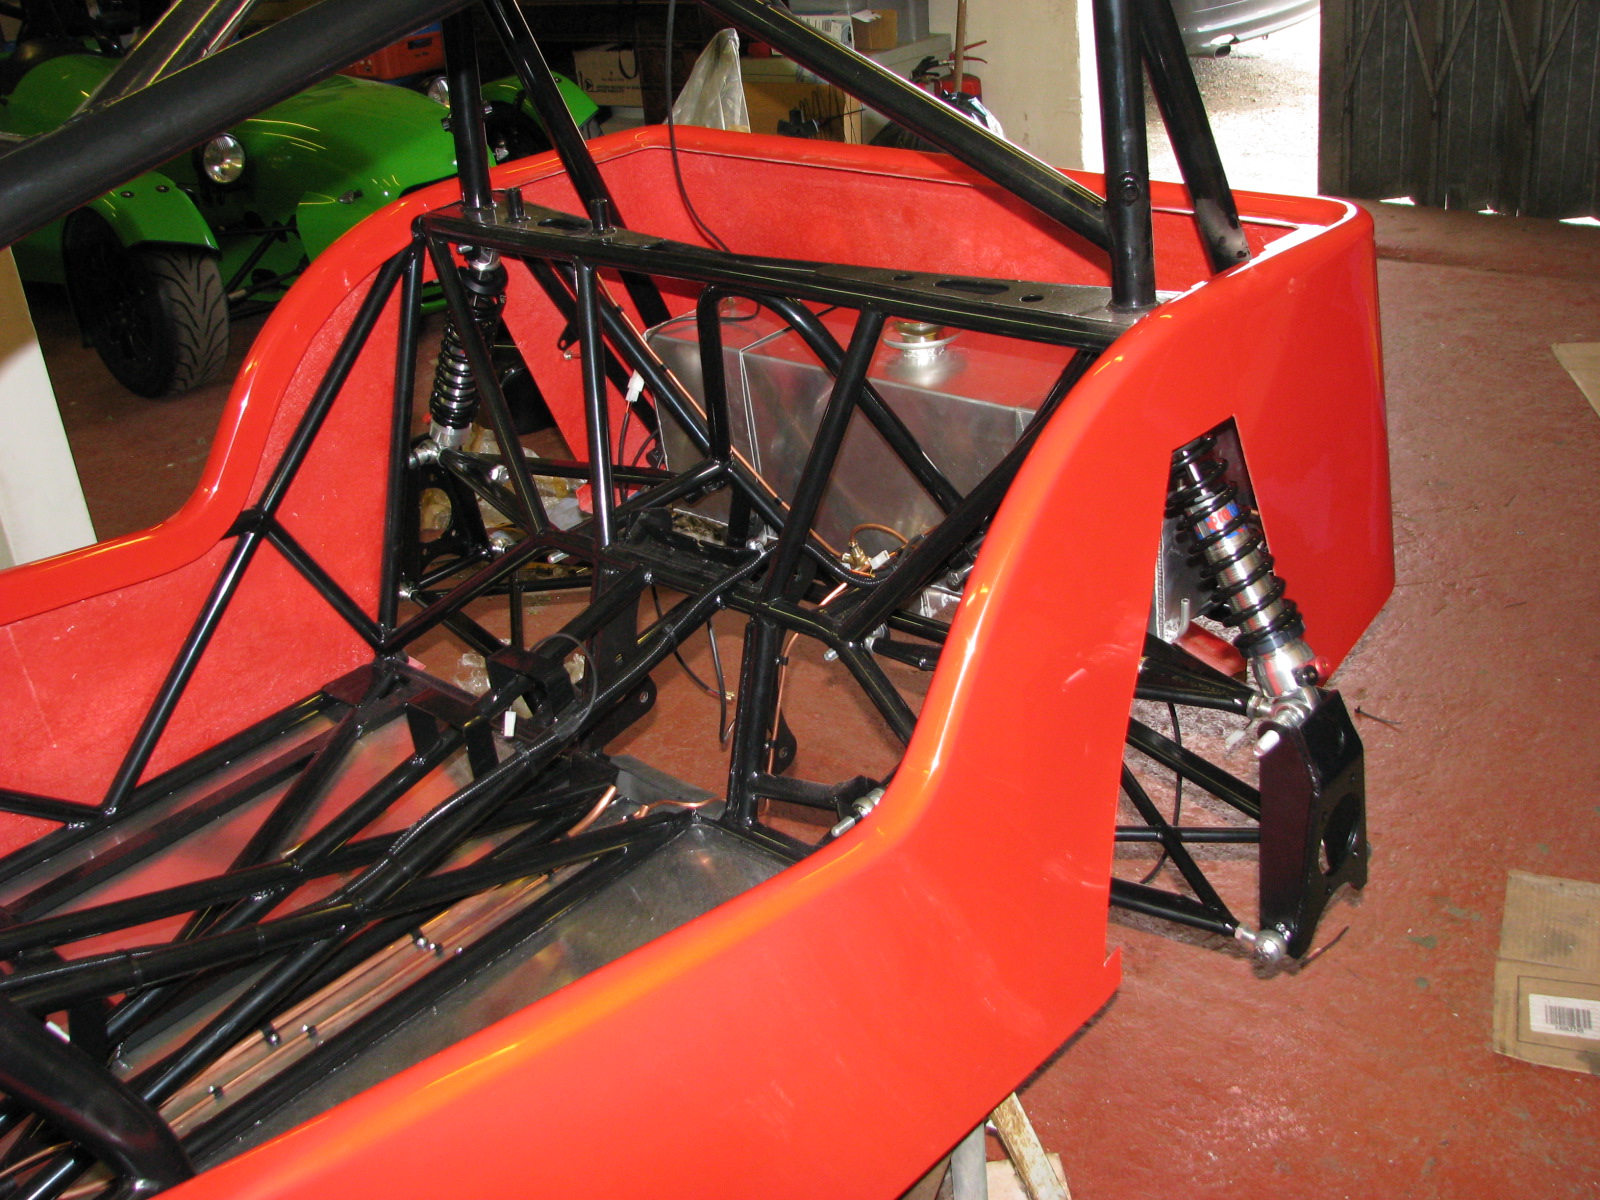
The first job was to re-adjust the spacing of the rear wishbones before assembling the diff and drive shafts. For the time being, I'm going to leave the washers in place, and replace them with spacers, once the suspension geometry is set up.

I had to modify the hole positions for the diff mounting,  as 2 of them were slightly out of position.
Once the diff was bolted in, I realised that I should have connected the fuel pipes first, as there is not a lot of room under the diff. Luckily I managed to connect them without taking the diff out.


With the diff in place we started to assemble the rear drive shafts and hubs.
As I'd chosen to use the Willwood Sierra rear calipers, I had to mount their adaptor brackets. The brackets can be mounted both round both ways, but only one way works, so make sure the machined face is mounted against the bearing housing.


Once the uprights were assembled with the hubs and caliper brackets, they were re-assembled to the wishbones and the calipers were bolted on.


To complete the rear end the handbrake was drilled and bolted on, and the cables routed.


As I plan to duct the radiator hot air out of the nose cone, I had to move the rad forward from it's original mountings. This meant fabricating some new brackets.
At the moment I've mounted directly to the rad, but I've just ordered some rubber bobbins for the mounts, to minimise the vibration into the Ali Rad.

Trial fitting brackets.

Next job is to set the steering position and get the column cut to length. This involved sitting in the seat and getting the a comfortable driving position, whist the positions were marked by Gavin.


I was happier than I look...honest !!


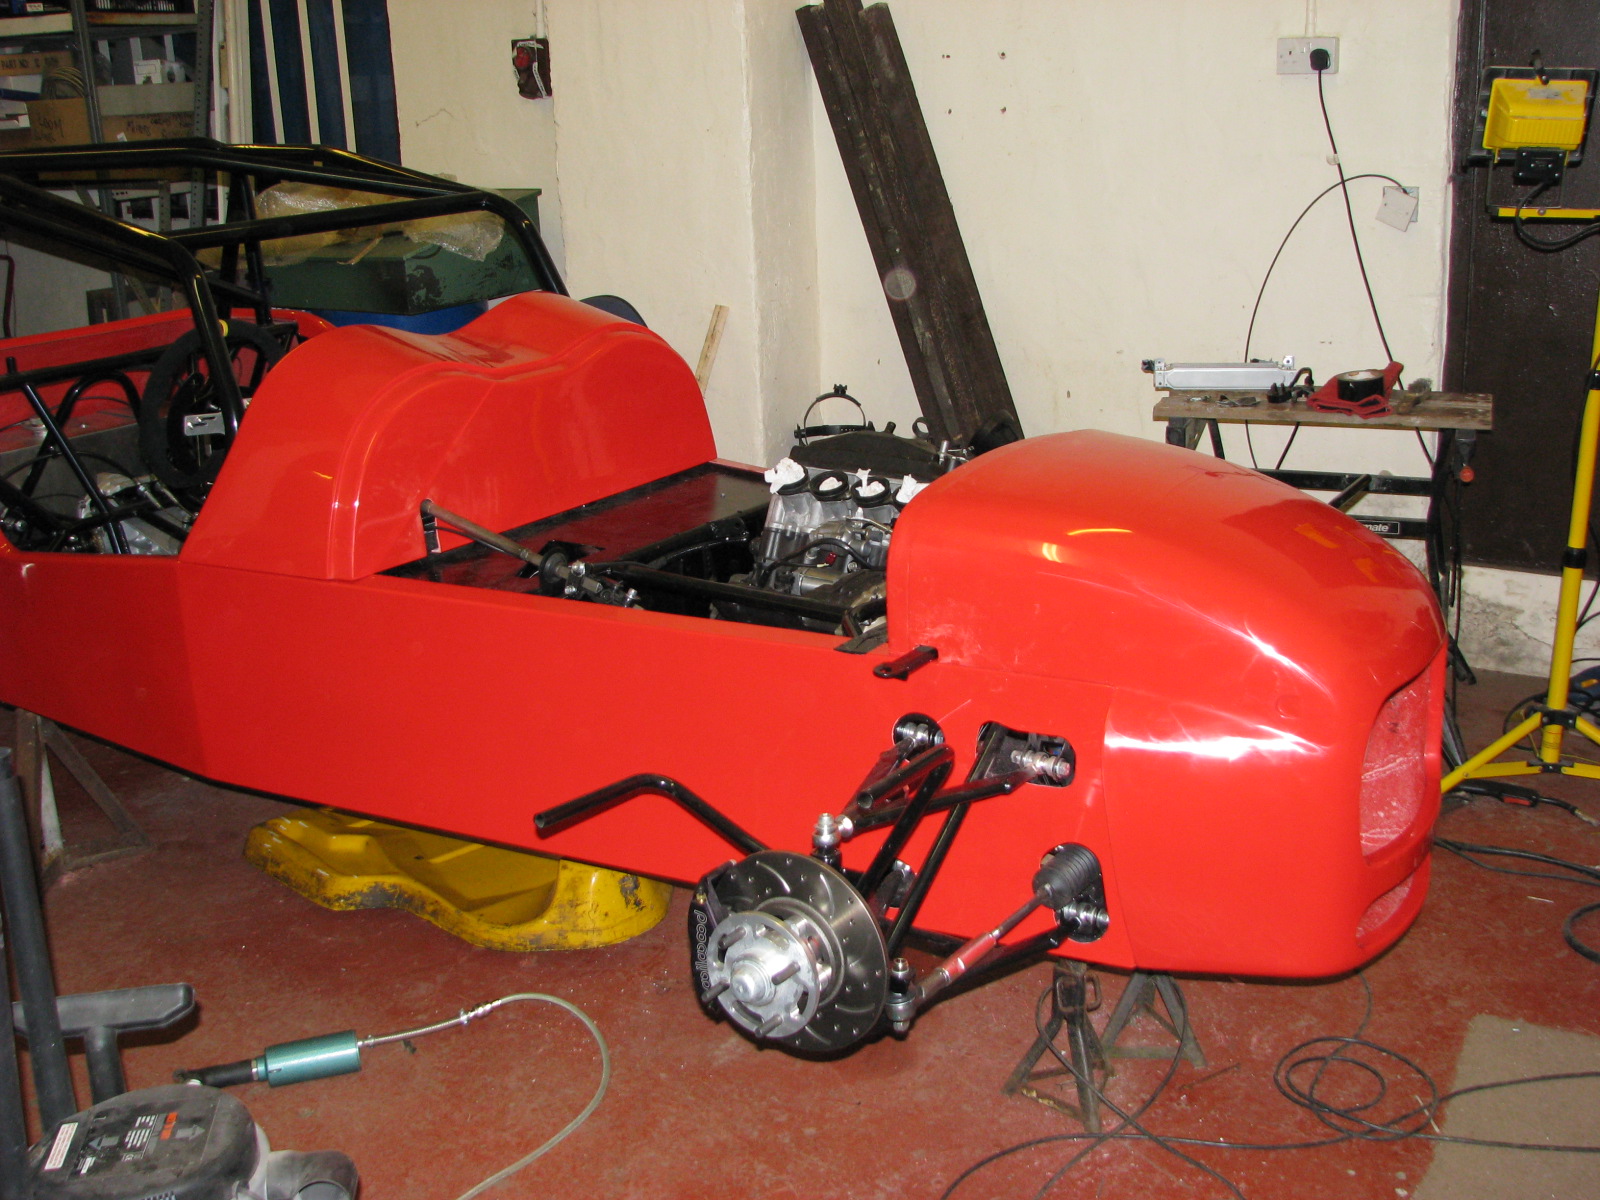
Once the steering column was positioned, I could start fitting the body.
The tub was riveted from underneath, but the top was left to allow for aligning the scuttle bonnet and nose.


The position for the steering column was marked on the scuttle, then slots cut to clear the column. I wanted to have slots, so that I can remove the scuttle without having to remove the column. I can finish the slots with a small bezel.

Next was to fit the nose, and check the bonnet length to ensure the scuttle position.


Everything aligned great. This is one of MNR's strong points, the body fitment and alignment is second to none.


Where's Gavin? Look carefully, he's the one in the Rusky hat!!


So this weeks finished on a high, I feel like I'm getting there, and once Xmas is over, I can finish fixing the body, then start to think about fitting the Engine :-)

Have a Great Christmas everyone, and a Happy New Year.


Monday 13 December 2010

Back building

Finally back building after 3 weeks off with my back problem. Lost a lot of time, so I'm going to be busy in my week off before Christmas.
The snow also hampered all my deliveries, most of the stuff turned up within a couple of days of the snow stopping, was like Christmas coming early.

So this weekend consisted of Christmas shopping on Saturday and a good day down the workshop on Sunday.

Jobs completed this week:

Pedal box fitted. Spent a lot of time getting the clutch cable routing right and checked the efforts. There's been a lot of comments about how heavy the clutch is on the CBR1000, but the 08 model doesn't seem any heavier than my old R1 so I think i'll stay with the cable, rather than going to a hydraulic clutch. I hope I don't come to regret this !!!!


Next job was rebuilding the diff. I must say a big thank you to my Uncle Tony for fitting the new bearings to the diff and carriers, while I was incapacitated.
The first time I tried to set the diff clearances, I had a tight spot which was probably down to some muck between the diff and crown wheel, so I had to pull it out again and take the crown wheel off, clean it and bolt it back up. With this done, I managed to get the clearances set and bolt it all back together.
With a fresh coat of paint, its ready to go in.


Whilst I was working on the Diff, Gavin was fitting my newly acquired extinguisher. He's getting good at laying under the car drilling holes ;-). Cheers Gav.


I was considering using twin pot willwood brakes on the rear, and fabricating a handbrake mechanism off the Diff, but decided to go with the simpler route of Powerlite calipers with the handbrake cable attached, it's more expensive, but I haven't got the time to mess around anymore, and I prefer the idea of having a proper hand brake, should there be any problems with the hydraulics.
One job that was needed with fitting the Powerlite rears, was to machine down the hubs to fit inside the 240 dia discs. I managed to do this in a machine shop we use at work, they let me use one of their Lathes. A big thank you to ASE for this, and I'm sure I'll be back for more at some point.

Going to bed now, I've got a 6.10 flight to Valencia in the morning, got to get up at 3am ouch!!!

Monday 22 November 2010

Bloody Back !!!!

Lost another weekend this week. Last week my back started spasming, I've never been in so much pain in all my life. Spent 3 days in bed, now walking (with a stick).
Been to the Physio and got some exercises to do.
Hope it sorts itself out soon, it's going to be a busy Christmas holiday.

Sunday 14 November 2010

Slow Progress....

It's been a few weeks since my last post, and progress has been slow.
I had a couple of weeks off, doing some DIY at home, decorating my Son's room and making a craft area for my wife, needed the Brownie points ;-)

Last weekend the front suspension was completed with the hubs assembled, brake discs and calipers fitted.


I'd been debating whether to get my diff rebuilt with the Tranx LSD or have a go myself. As I'd never built a diff before........., I decided to have a go!!
I found a site that explained the basics of stripping in and rebuilding the diff, http://www.mc2racing.com/tech/20081104a/index.html

First job was to make a tool to remove the bearing carriers, lucky for me, George didn't need the old discs from his Mazda doner (cheers George).
We measured the pitch of the teeth on the carrier, drilled and tapped a series of holes around the disc that matched the castellations, then fitted some M6 screws. With a lenth of bar bolted to the diff, we had a carrier removing tool.
Holding the diff in the vice, the carriers were unscrewed carefully, to make sure the crown wheel didn't get damaged.
With the old diff removed the crown wheel was unbolted and carefully removed with a brass drift.
I'm not planning to remove the Pinion so will only replace the diff carrier bearings, these are going to need to be done on a press, so I need to call a friendly workshop I know.
With the crown wheel removed it was aligned to the new Tranx LSD and bolted together.


With the help of George, Gavin and a swan necked lift, we fitted the engine loosely, to start thinking  about cooling pipes and rad location.


This weeks been another lost weekend, as my backs been playing me up (nothing to do with the engine).
I planned to fit the radiator, but could hardly stand, so after making a bracket up, I called it a day.
Big thank you to Gavin though, he got under the car and fitted my reverse box.

Hopefully my backs better this week, I hope to get the diff in next weekend.


Sunday 17 October 2010

Steering Rack and Front Suspension

Today I finished fitting the Steering rack.
Apart from having to file the brackets out a little, to fit the rack, it went in very easily. The bolts were a little long, so they were cut down (a bit more weight out!!).


Before fitting the front wishbones, the powder coating in the bolt holes needed to be cleaned out.  I also measured and cut the bolts down in advance.
The lower wishbones were fitted first, loosly fitting the bolts, so I could assemble the upright and upper wishbone.
The uprights are steel lightweight specials, which are actually lighter than the alloy ones available, I did have to tap out the powdercoating, but again, no other problems with fitting them.
The washers were fitted, but only to hold the bones in a rough position, as I want to get proper spacers made to replace them.
With the balljoints fitted, the front suspension is assembled, although it needs to be setup.


Saturday 9 October 2010

Day 6

Last day of my holiday today, so will be my last report for a week.

Today I started bolting on the rear suspension, I've only loosely assembled the wishbones, as I need to work out the spacer dimensions and alignment. that will have to wait for next week now :-(


To assemble the front wishbones, the body needs to be cut out, which is a job that most people dread, but you can't see both sides at the same time, so if they don't match, it's not the end of the world.


With the holes cut, last job was to trial fit the steering rack, the brackets are a bit tight, so they
need to be eased out with a file to fit snugly.


So I've done around 42 hours work on it this week, and I've got around 10 days (1 day per weekend) till the end of the year (not including Xmas holiday) to finish against my target.  

It's going to be a challenge !!

Keep watching.


Friday 8 October 2010

Day 4&5

I missed posting yesterday, as I went out for a beer and curry (didn't help the weight loss for next year!!)

Yesterday started with painting the bulkhead panels, although I only had a paint on primer, so there's a few to many brush marks in the final finish than I would have liked. Should have gone with powder coating, but I couldn't wait !!

The rear loom was fitted although I had to wait for the panels to be dry before I could fit the front section. The MNR loom is very easy to fit and lines up fine.


Final job of the day was to run all the front brake lines and rivet them in place.

Today with the panels dry, I sealed and riveted all the panels.


With the panels fitted I could finish running the front loom.


With all the main lines in place, its time to start with the bolt on bits.
I started with the front Rocker and Shock assys.
The rockers are made from billet aluminium (very nice),and run with needle and Thrust bearings. All the bolts were cut down to reduce weight, (couple more curries I can have).


The final job of the day was to fit the body tub. Had  some help from George with this, but goes on very easy, and is finished well.


It's starting to look like a car now. Hopefully I'll have all the rear suspension on tomorrow.

Wednesday 6 October 2010

Day 3

Today was a good day, but also frustrating. I did a trial assembly of the diff, and found I couldn't get the diff in with where the lines were run, so I had to drill out the rear clips and re-position the fuel lines.

Once I got the diff in, I started laying out the rear brake lines, changing my mind a couple of times.
I've found most of my time is spent thinking about the best way to lay things out, for ease of access and safety.

I managed to get all the rear brake lines and rear loom clipped in, then started to finish drilling the bulkhead panels.

A handy tip when drilling the panels, get yourself some temporary rivets, they come with a tool to insert and remove them (thanks to George for lending them to me). You drill the first hole, then insert the first t-rivet, this holds the panel for the next one. Once you have 2 in you can drill all the other holes without worrying about holding the panel.
Temporary rivet with tool.


Rivets in place.

With the front panels finished I started to fit the loom through to the bulkhead.

Final job of the day was to have a tidy up (the wife popped in after work and commented on the mess!!), so I got the vacuum out (wonders will never cease!!)

Tuesday 5 October 2010

Day 2

Better day today, started with finishing the bulkhead panels, then popped into ETB to order my Digidash Pro+. Spent more money!! ( but only what I budgeted, if the wife's reading :-)

This afternoon was spent bending fuel and brake lines, making sure they are all clear of any sharp edges and not rubbing on anything, I hate this job.


My last job ofthe day was to start laying the loom out, I hope to get this fixed in tomorrow.


I couldn't resist having a sit in it, my excuse was to see how long the steering column needs to be (come on we've all done it).


Monday 4 October 2010

Day 1

Started slow today, I had to go to dentist this morning, then sort out my son's scooter insurance, so I didn't really get going till midday.

Took the engine out first. I'd put it in the chassis for transport, but was in the way for running the fuel and brake lines.
I decided to split the pedal box bulkhead panel, to make it easy to access the pedal box if necessary, and got all the holes drilled to mount the box and panel.


I wasn't happy with the pedal box pivots, so made up some spacers, and machined out the pivot bushes so they would run on the spacers. This all meant I could bolt up the pivots tight without clamping the pedals.

My final job of the day was to make the tank straps and mount the fuel tank.


I forgot to take the camera to the workshop today, so will get some pics tomorrow.

Sunday 3 October 2010

Welcome

Welcome to my Blog.

Unfortunately I missed the opportunity to write a blog of my first build, but here's the highlights.

2005, After looking at all the other kit manufacturers, I bought an MNR RT+ kit with an R1. I was sold after being taken out by Marc at Brands.
I did originally want a duratec powered car, but after experiencing a bike powered car, I was sold on it.

2006 Car was SVA'd

2006-2010 lots of shows and trackdays.

2010, I decided I wanted more than just trackdays, so decided to sell the car, and build a new car to go racing in the 750mc RGB series.

This is the last picture of my old car at it's new home :-(


So with a bundle of notes in my pocket, I started looking at what kit I should build for racing.

I could have gone with a tried and tested Fury based car, but with the experience I'd had with MNR and my belief that their chassis/setup works well, I decided to stick with them.

After discussing with Chris and Marc, we agreed a package and did a deal :-)

The only change I made, after my initial decision, was on the engine. I originally wanted an 08 R1, but following many failures in the field (thanks to Andy Bates for bringing it to my attention), I decided to go with the 08 CBR1000.

So final package:

MNR RT+ Chassis with full cage
08 CBR1000
Willwood Brakes
13" ProRace 1.2 wheels
DigiDash 2 Pro+
Plus all the rest of the bits to make it work....

So on the 27th September I took my trailer up to Harrogate to pick up my new project from MNR.

Chassis safe and sound in new home.

 I've now got a week off work to get as much done as possible, as I've got a deadline of Christmas to get it finished. This should give me a few months to get the car set up and ready for the start of the season.

So watch this space, I'll try to keep it updated at every step.

Cheers, Steve.