I'd hoped to start building on Saturday, but my back was playing up again, so I had the weekend off, and was in a foul mood, by Sunday night, thinking I was going to loose another weeks building.
I'd booked this week off so was happy that my back felt better on Monday morning, and armed with sandwiches biscuits and tea,I made my way to the workshop.
I made good progress this week, especially with the extra help from Gavin.
The first job was to re-adjust the spacing of the rear wishbones before assembling the diff and drive shafts. For the time being, I'm going to leave the washers in place, and replace them with spacers, once the suspension geometry is set up.
I had to modify the hole positions for the diff mounting, as 2 of them were slightly out of position.
Once the diff was bolted in, I realised that I should have connected the fuel pipes first, as there is not a lot of room under the diff. Luckily I managed to connect them without taking the diff out.
With the diff in place we started to assemble the rear drive shafts and hubs.
As I'd chosen to use the Willwood Sierra rear calipers, I had to mount their adaptor brackets. The brackets can be mounted both round both ways, but only one way works, so make sure the machined face is mounted against the bearing housing.
Once the uprights were assembled with the hubs and caliper brackets, they were re-assembled to the wishbones and the calipers were bolted on.
To complete the rear end the handbrake was drilled and bolted on, and the cables routed.
As I plan to duct the radiator hot air out of the nose cone, I had to move the rad forward from it's original mountings. This meant fabricating some new brackets.
At the moment I've mounted directly to the rad, but I've just ordered some rubber bobbins for the mounts, to minimise the vibration into the Ali Rad.
 |
| Trial fitting brackets. |
Next job is to set the steering position and get the column cut to length. This involved sitting in the seat and getting the a comfortable driving position, whist the positions were marked by Gavin.
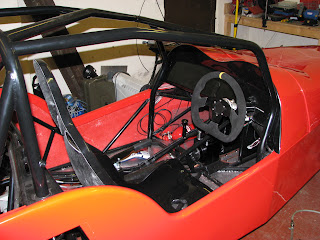
Once the steering column was positioned, I could start fitting the body.
The tub was riveted from underneath, but the top was left to allow for aligning the scuttle bonnet and nose.
The position for the steering column was marked on the scuttle, then slots cut to clear the column. I wanted to have slots, so that I can remove the scuttle without having to remove the column. I can finish the slots with a small bezel.
Next was to fit the nose, and check the bonnet length to ensure the scuttle position.
Everything aligned great. This is one of MNR's strong points, the body fitment and alignment is second to none.
 |
| Where's Gavin? Look carefully, he's the one in the Rusky hat!! |
So this weeks finished on a high, I feel like I'm getting there, and once Xmas is over, I can finish fixing the body, then start to think about fitting the Engine :-)
Have a Great Christmas everyone, and a Happy New Year.


